Showing posts with label candle. Show all posts

Saturday, November 10, 2012

DIWALI DIYA / LAMPS


Hi friends .. 

First of all let me wish you and your family a Very Happy and Safe Diwali. Only 3more days left guys.. Lets make this diwali special by revamping your old clay diya’s with some  colorful, handmade diya’s…..     

Take out your old Diwali clay lamps and follow these simple steps to get a new look


Firstly color your old clay lamps with some bright colors .. Here I have used hobby ideas pearl colors.. Let it dry for some time…


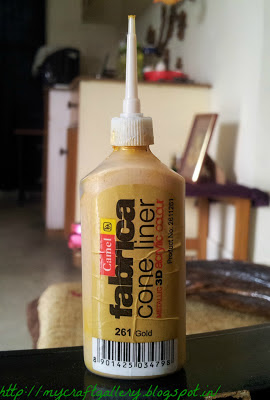
Once it is dried decorate it using a 3d out liner in the way you want.. Here I have used gold metallic color for that.. Do it carefully… Keep a waste cloth near to wipe when the design gets wrong.  Let it dry completely…Don’t worry If you don’t have these outliner  just stick some sequences/glitters on your lamp… 

Your Diwali diya is ready.. Is’nt it pretty… If you want to use it as a candle then melt some wax candle and pour into it.. Don’t forget to put the wick before pouring the melted wax…


If u want to use it as a decor u may try double color... (try out dark color inside and contrast color outside)

Will upload the lit lamps on Diwali :)

 If you have any doubts message me in the comment space below… 

Keep smiling :) Pin It

Thursday, August 2, 2012

DIY-GLASS CANDLE HOLDER


Now a days I am obsessed with lights and what ever I think of making is related to lights/candles. 
 
We all will be having old glass cups in our house, either it will be a tea cup or a juice glass( I’m talking about the transparent ones). Whether it’s a good one or bad it doesn’t take much time to convert it into a beautiful candle holder. Let’s see how.


Take the cup/glass which you are going to use, wash and keep it under sunlight to dry. Now take the color which you are having, either acrylic or poster in a bowl.. Add water and make it a semi translucent liquid. Transparency of the glass depends on the amount of water you mix with color.  Take care while mixing water and color.. It should not form any bubbles or lumps. I did a mistake while mixing it and one of my piece got small lump in it. 


Now pour the color into the glass. Make sure you don’t fall short of color. (don't worry u can always reuse the color which is left). Start rotating the cup/glass slowly with 2 hands as shown in the pic. 


Once the whole glass is filled with color  hold it downwards to drain of excess color to the bowl. 

I applied the same procedure to my other glass also.......


 Wipe out the excess color slowly from the sides with a tissue/cotton.Keep it under the sunlight for 1 day .Ensure that it has dried completely so that you can keep the candle inside it and use..
 
I experimented it using different color's with different color concentration to check the transparency. You can try your own combinations .....


I mixed some color with fevicol and got this effect on my glass…Here the design of the glass can be seen when its lighted… 


What are you guys waiting, take out your old cup/glass ware and try it out now… If u want to impress someone or do a candle light dinner then this will be a great idea. 

Checkout my other candle project  here 

:)
keepsmiling
Pin It

Wednesday, July 25, 2012

PRETTY LIVING ROOM DECOR WITH A CHUNK OF WOOD


This time my visit to Nainital had fetched me some really old wooden pieces. You know I couldn’t leave them behind on my way back. After coming back my first job was to get it into some attractive form so that I could flaunt it in my living room :).

 I made this

 from this
 

First I Washed the wood and kept it in open sunlight to dry completely. Once it dried, I  cleaned  it using a sandpaper to make the surface of the wood smooth. In order to make it look appealing I applied two wood coats over it (to get the shiny look). Apply the second coat only after the first coat has dried. Sorry people, in a hurry I just forgot to take a snap of the wooden piece after applying the wood coat.

Took this pic after cleaning with sandpaper


It looked good but I found something missing. Then I took a coconut shell and broke it in to small pieces ( Just broke them randomly).. I took three different sized pieces , one big , one medium and a small piece. 


Cleaned the hard surface of coconut shell with knife and applied the same wood coat. Next job was to stick these on to the wooden piece so that it can act as stand for candles. But still I couldn’t stop. I wanted some thing colorful so that my living room looked lively. So I planned to stick some colored dry leaves on to the broken coconut shell which I had already stuck on the wooden piece. 


Next job was to color  the candle base with the same color as that of the dry leaves stuck on the coconut shell . I used hobby ideas color for this...


And that’s it my little hard work has rewarded me with a wonderful decor for my living room. Its so awesome, I’m loving it. If u like it then drop in your comments or may be a different idea with the same stuff. You can get my updates by liking in my Facebook page click here

Tips

To remove the varnish from your brush keep it in a bowl with turpentine after your work.. Clean it with water after sometime..

:)
keepsmiling

Pin It

Monday, April 30, 2012

MY FIRST GEL CANDLE

I hope every one loves candles and would never miss one for their special occasions. They make the moment so romantic :)

Have you ever stared at those transparent gel candles during any of your window shopping sessions, then its time to make one of your own. They burn for more time than wax candles.


Don't worry about the materials. You will get it at your nearby craft shop.

To make a gel candle you can use any kind of glass bowl/cups. Here I've used the jar which I got with nutella and decorated it with some green coloured stones and some bamboo sticks in which our name is written.


Now place the wick in the middle and support the other end of the wick with a pencil as shown in the pic (otherwise the wick will move while pouring the wax). I added some dry leaves in between.


Take a small amount of gel wax in a pan and keep it in a low flame otherwise there is a chance for it to burn. For your safety I suggest you all to double boil it. ie, boil water in one pan and keep another pan with gel wax in it. It would take little more time than the normal procedure but its always safe. But make sure that the water is not going into the wax pan).


 Once it is melted completely I added one small drop of perfume in it . After that pour it in to the glass jar slowly. This is done to reduce the chance of formation of bubble. (Don't worry if some melted wax is left. It will  harden very fast and you can keep it for later use).


It will take an hour for this to completely set. After that cut the wick as much as u want. Isn't it lovely???


 I loved doing this, will come up with a coloured one later.

:)


Pin It